唔,稍微聊一下unity中扩展编辑器的相关内容。
UNITY:擴展編輯器
前置问题
为什么要用unity
基本上,游戏开发大概用啥都可以,能做出想要的效果就好,用unity大概只是因为unity有一些其他引擎没有的优点。
比如相对而言对“小白”更友好,更符合直观逻辑等,不过可能主要还是最近工作使用的是Unity引擎,毕竟屁股决定脑袋。

但是对于一个入门的新人来讲,不总是需要挑一个来用用看的吗,所以选Unity也还不错。
为什么要扩展编辑器
首先,并不是所有人的计算机科班出生,有编程基础,可能对于从事设计的同学来讲,去了解底层代码的运作是代价很大的,去亲自编写逻辑代码,生产和维护是成本昂贵的。
所以会有专门的程序来做一些脚手架或者中间层之类的东西,为策划提供出编辑上的接口,来简化修改这个过程。
接下来我们就来正式的聊聊如何扩展Unity的编辑器。
正文部分
当然如果需要详细且细致step by step的过程介绍,可以看参考里面的一些介绍,总体来看我们可以定义Unity编辑器对一些数据在Inspector的渲染过程,也可以自己新建一个窗口。
ImGUI概述
咱也算是写过诸如Web,UWP等等等UI系统的,然后Unity里面的这套管叫ImGUI,名字的意识大概是立即UI,是给个返回值的那套UI,所以我们要记得最后把值赋值回去。
扩展Inspector
Inspector上是可以显示附上的代码的一些public字段的,对于一些复杂的数据类型的实例,或者对于一些我们希望自定义渲染行为的数据,还是有方法可以自定义他的渲染过程的。

大概的思路是实现一个继承于PropertyDrawer的渲染特定数据类型的实例,并重写函数实现对应的渲染过程,贴个例子代码:
    // custion serializable class
    [Serializable]
    public class Ingredient {
        public string name;
        public int amount = 1;
        public IngredientUnit unit;
    }

    // IngredientDrawer
    [CustomPropertyDrawer(typeof(Ingredient))]
    public class IngredientDrawer : PropertyDrawer {
        // Draw the propery inside the given rect
        public override void OnGUI(Rect position, SerializedProperty property, GUIContent label) {
            // Using BeginProperty / EndProperty on the parent property means that
            // prefab override logic works on the entire property.
            EditorGUI.BeginProperty(position, label, property);

            // Draw label
            position = EditorGUI.PrefixLabel(position, GUIUtility.GetControlID(FocusType.Passive), label);

            // Don't make child fields be indented
            var indent = EditorGUI.indentLevel;
            EditorGUI.indentLevel = 0;
            // Calculate rects
            var amountRect = new Rect(position.x, position.y, 30, position.height);
            var unitRect = new Rect(position.x + 35, position.y, 50, position.height);
            var nameRect = new Rect(position.x + 90, position.y, position.width - 90, position.height);

            // Draw fields - pass GUIContent.none to each so they can draw with labels
            EditorGUI.PropertyField(amountRect, property.FindPropertyRelative("amount"), GUIContent.none);
            EditorGUI.PropertyField(unitRect, property.FindPropertyRelative("unit"), GUIContent.none);
            EditorGUI.PropertyField(nameRect, property.FindPropertyRelative("name"), GUIContent.none);

            // Set indent back to what is was
            EditorGUI.indentLevel = indent;

            EditorGUI.EndProperty();
        }
    }
扩展新窗体
这个就也很简单了,大概是写个渲染函数留个入口就可以了。
// Add menu item named "My Window" to the Window menu
[MenuItem("Jsky/HelloWorld")]
public static void ShowWindow() {
//Show existing window instance. If one doesn't exist, make one.
EditorWindow.GetWindow(typeof(HelloWindow));
}
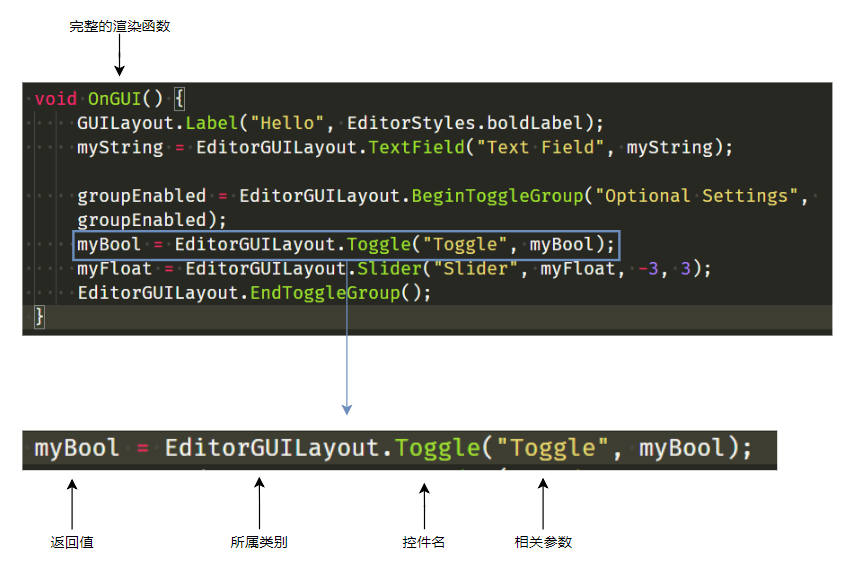
void OnGUI() {
GUILayout.Label("Hello", EditorStyles.boldLabel);
myString = EditorGUILayout.TextField("Text Field", myString);
groupEnabled = EditorGUILayout.BeginToggleGroup("Optional Settings", groupEnabled);
myBool = EditorGUILayout.Toggle("Toggle", myBool);
myFloat = EditorGUILayout.Slider("Slider", myFloat, -3, 3);
EditorGUILayout.EndToggleGroup();
}
虽然具体选择上有点讲究,以及在基础的内容往上可以做的事情还很多,但是这里就写到这里好了。